
Hello all! I know I haven’t posted in a while, I’ve been very busy working on my surface design course which I’m loving (more on that soon I promise). Anyway, I finally got a window to sew this little number for a theatre opening night I attended this week. The Pattern– This was my first time working with a Named pattern, they’ve been on my list for a while because I think their designs are really modern and different. The Inari Tee Dress is an unlined cocoon shaped, dart-less dress with separate turned up cuff pieces, high low hemline with side vents and two neckline finishing options. Made for both knit and woven, the variation is a cropped a-line tee. .
 The Fabric– I’ve been sitting with this fabric for about a year wondering what the hell I was going to do with it. I fell in love with the print when I saw it in the bargain bin on a Perth trip and had to have it. As soon as I touched it I knew it was poly but I didn’t care. I think it was the end of the role because it has a fault which you can see in the below shot if you look closely (only discovered this as I was cutting it out, poo).
 So, what to do with medium weight polyester with a fab graphic print? First thing I thought was a shift dress but I didn’t want it to have a retro vibe because the print is so modern. Enter the Inari dress, I actually think it’s perfect for a cocoon dress because it gives it a little structure to show off the shape.
 For the lining I used a white cotton voile with a little stretch in it, I try to always have some of this in my stash in black and white for last minute lining decisions.
 The Construction– As you can imagine this pattern goes together really quickly (gotta love that). Sizing was painless, my measurements put me in the UK 12 bracket and that’s what you see here. I knew I wanted to line it because – polyester against the skin in a no go. So I decided to make it up as per the instructions then attach the lining after, maybe not the smartest idea. I couldn’t attach the lining to the hem because it kept interrupting the fall of the dress which is a really important feature of the pattern, on reflection maybe underlining would’ve been smarter.
 The only modification I made was to take an inch off the length which I usually always do being 5’5′.
 I’m really happy with how it turned out and so glad I finally get to sport this fabric stash fav. Don’t you hate seeing fabulous fabric idle away in your stash because you just don’t know what to do with it?
New Look 6262 in Cotton Plaid
The Pattern– my second New Look 6262 (first one here). The Fabric– I’ve had this fabric in my stash for a while, I picked it up at Fabric-a-brac second hand fabric market ages ago. It’s 100% cotton plaid (it’s amazing what people want to get rid of) I just love the vibrant colour. And, before you say it, I’ve already titled it my Picnic Blanket dress.
 The Construction– I’ve been meaning to make a dress with a fully lined bodice for a long time, usually I just bias bind the neck and arm holes or apply facings. So, I picked up some cotton voile with a little stretch in it at the recent Fabric Store sale in Sydney in preparation. I referenced Kitchy Coo’s and The Slapdash Sewist’s tutorials for help. I love the clean look inside and it’s so nice to have no visible stitches on the outside.
 I’ve already made a couple of midi length dresses and I really like them (check them out here 1,2,3), I think the length goes really well with this sleeveless version.
 Unfortunately my pattern matching at the back leaves a lot to be desired. I always seem to forget one thing! I focused on matching the side seams when I was cutting and totally forgot about the back centre seam. Cutting as a single layer would have helped.
 Coming Soon– just grabbing the hammer to bang in the rivets on my Closet Case File’s Ginger jeans. Very exciting!
Share my progress as I study Surface Design this year!
I think this year is going to be a busy one for me. After completing a Certificate IV in Colour and Design at ISCD and graduating with an Award for Excellence I’m taking the next step and going onto the year long diploma in Surface Design. It’s a massive commitment but the idea of one day being able to design my own fabric is keeping all the doubts at bay for the moment.
I think I knew my love of sewing would take my life in an interesting direction from my very first stitches back in 2012, I just didn’t know where until now. I think surface design is a natural evolution born out of a love (read semi-addiction) of beautiful colourful fabrics which I know many of you share.
After posting some of my practise sketches on my instagram feed and getting some encouraging responses I felt confident enough to write this post. So…. with your indulgence I’d like to use this platform to share my progress with you throughout the year as my hope is it will be of interest to some of you sewists out there. I will still be sewing of course just maybe not at the same volume as in years past.
Here’s a little sample of my practise working with different mediums over the past month before the course started.
 Clockwise from top Left- 1 & 2 watercolour and pitt artist pens, 3 still life in charcoal pencil, 4 freehand geometrics with pitt artist pens, 5 suminagashi dye on paper, 6 gouache paint floral pattern.
 freehand satin stitch embroidery
  I had to share this one separately because it won me the week 3 prize for Creative Bug‘s Lisa Congdon sketchbook exploration course. I was so excited, it was the perfect confidence boost before the start of my new course.
Thank you so much dear readers for your support and wish me luck!
**I’d love to know your views- would these creative updates be of interest to you as fabric lovers??**
New Look 6262 in African Wax Print
This dress was inspired by all the Christine Hayes Emery Dresses I’ve been following online. But my when my regular online pattern retailers were all out I just couldn’t wait so I picked up New Look 6262 from a Spotlight sale. It’s an unlined dress with 4 versions all with gathered a-line skirt and finished with a neckline facing. Modifications– I made a muslin (size 12, version B) because I wanted the bodice nice and fitted and I know I want to make it again in a sleeveless and maybe a midi length. I had to raise the waistline a couple of inches and I added a little ease to the sleeve cap because it was pulling slightly across the high bust. I think I’ll add pockets for the next one.
 Fabric– my sister bought this gorgeous print back from a London trip especially for me. This is my second time working with African wax (first make here). As with many African wax prints added time for pattern matching was essential due to the large repeats. I was so careful about this stage but I still managed to mess it up. If you’ve got a keen eye compare the front and back centre line and you’ll notice what I did.
 I’ve haven’t been able to find many bloggers who have made this pattern so here are just a few: Oh So Pretty‘s two makes of version B, for the French speakers among you Petit Poisson Rose‘s lovely navy number and check out the gorgeous collar detail on Needle and Thread‘s V-neck version.
 I’m really happy with how this dress turned out, which means I’m sure you’ll be seeing at least another one sometime soon, although I’ll have to add it to the long list.
Men’s Shirt Refashion (part 2 bottom half)
So, here is the companion piece to my last men’s shirt refashion. I hope you recognise the blue linen… yes, it’s the bottom half! The top half started life as a medium men’s shirt in 100% of the most gorgeous cotton, it was so well made and the white buttons (which I used all of on this make) were beautiful. It was almost a shame to cut it up…almost.  This dress was very much inspired by Grainline’s Alder shirtdress pattern which I do intend to make because I love her patterns and they always work really well for me.
 Construction – I removed the sleeves of the olive shirt and cut the bodice using McCall’s 6696. I agonised over the horizontal seam; should it sit above, at, or below the waist??? It’s always a danger with colour blocking like this that you end up looking cut in half and a bit stocky. I decided on ever so slightly above the waist. I’d love to hear your preferences on waistline placements for loose fitting dresses and tops BTW.
 I was thinking about adding fish eye darts around the waist but decided a simple box pleat at the centre back was enough to cinch in the waist without busying up the colour blocked seam.
 I had to redo the button placket on the bottom half linen section because the detail was different (you can see it here).
 I bound the armholes with drafted bias strips from the discarded sleeves. The original linen shirt had a straight hem but I added a slight curve up at the side seams which I think was a nice addition. You can see I’m sticking to my “loose waist=shorter hemline” rule a little more for this make (I know the last one was a midi length, still works though I reckon).
 Refashion tips I learned on this make:
- When secondhand shopping for refashion pieces look for quality of fabric.
- Because the olive shirt was a medium I made sure to unpick the armhole stitches instead of cutting them off like I did on my first refashion. This makes sure you get the most out of the fabric, you never know, it may come in handy.
- Unpicking serged stitches is a massive drag.
Men’s Shirt Refashion (part 1 – top half)
Let me assure you all I have been sewing lots of thing I just haven’t had a chance to photograph anything, it’s always the hardest part I find. This little dress was a quick refashion that was completed for Repurpose Reuse Refashion way back in August. Following Sally’s advice from her top 5 refashion tips to go for big sizes so you’ve got lots of fabric to work with I bought an XL chambray linen Country Road men’s button up shirt for $4.
 First off I unpicked the sleeves and was all set to cut a sleeveless version but I noticed that if I took the side seams in as is it created a nice cap sleeve. So I just flattened it out, turned under the seam allowance of the armholes then joined the side seams.
 The bottom half was a rayon/spandex remnant I got from The Fabric Store. I had no idea what to do with it but I loved the colour and have always been a big fan of rayon (my April Rhodes Staple Dress is rayon jersey, so gorgeous). It was a bit sheer so I decided to fold it in half along lengthwise and attach the cut seams to the waistline leaving the fold as the hemline. Kind of like a bubble skirt without the pouf.
  Well chuffed with the result of this experiment, I love the colour combo and the skirt construction. Happy to report I’m getting more confident with following my sewing instincts.
 Next up -the other refashion I made from the bottom half of the chambray shirt.
Selfish Sewing Week- Adelaide top by See Kate Sew
It’s that time again, Selfish Sewing Week brought to you by Imagine Gnats and Kollabora! So many fabulous makes and new indie patterns I didn’t even know about are making their way onto blogs all over the place. And guess what, you all get the chance to win one of 40 new indie patterns, you heard right! Click here to enter and win big. Out of all the patterns on offer to the featured stitchers I decided on the Adelaide top by See Kate Sew, love the details on the pattern- front bib with ruffles, bust darts, cap sleeves, back key hole with elastic loop and shank button closure and neckline facing. I don’t think there is anything else like this out there at the moment, I get a real librarian chic vibe from her patterns.
 For the sizing I decided on the small even though my bust measurement sits at the top end. It fits great but it is snug around the upper bust but that’s on purpose, any looser and it might look a little boxy I reckon so I’m happy.
 The only modification I made was to take 3″ off the length, I’m a little short in the waist so this is a usual adjustment for me.
 The elastic I used for the key hole loop is a little thick but it was in my stash and it does the job. The button I used was leftover from my sleeveless Grainline Archer from ages ago.
 The fabric I chose was sitting in my stash, it’s an old thrifted Bonds doona cover from The Salvos, I love the pink and grey together. I just knew the stripes would go really well especially with the ruffles. Cutting it out was a pain though, I had to do it on the floor single layer to match up the stripes, but well worth it. I really like the pattern to fabric combo I’m calling it my circus top though, it’s a little Big Top isn’t it? I’m going with it.
 I didn’t have any issues with this make, it was really fun and interesting. I hadn’t sewed a keyhole facing before and I spent a bit of time getting the ruffle on the front distributed evenly. Plus being 100% cotton it sewed and pressed really well which is always nice.
Big thanks go out to Imagine Gnats and See Kate Sew, I just love Selfish Sewing Week. Don’t forget to upload your selfish makes on Kollabora to join in the fun and good luck in the giveaway.
Repurpose Reuse Refashion Winners Announced!
Our esteemed judge has sweated over all your fabulous entries and come to her conclusions, an unenviable task I might add. Congratulations everyone and thank you all so much for your contributions. Sally has generously guest posted for the announcement so let’s get on with it shall we?
First of all, thank you very much to the 35 entrants to the competition. The standard was very high and I really enjoyed looking through your innovative refashions! If you haven’t seen the entries, take a look at the Flickr group here:
Anyway, I know you are on the edge of your seats to find out who won the prizes. So without further ado…
Drumroll please…
The ‘Best Use of Dye’ award goes to….
Sue at Fadanista www.Fadanista.com ! Sue bought three similar T-shirts and dyed them all the same colour to make this fantastic easy-to-wear dress. Congratulations Sue! The ‘So Simple but So Effective’ award goes to…
Amy at Craft & Thrift http://craftandthrift.blogspot.co.uk/ ! Amy cut up the front of her jumper and used velvet ribbon as a facing on both sides, then added buttons and buttonholes to her new cardigan! The ‘Fearless Use of Bleach’ award goes to…
Almost a Hippy http://almostahippy.blogspot.com.au ! She made this really striking dress by pouring bleach freehand over this little beauty. It’s sensational! The ‘Most Interesting Thrifted Fabric’ award goes to…
Lady Lauriston for this sweater-to-skirt refashion! Some of the most interesting material I’ve seen and it made a really great, versatile skirt. Well done, your Ladyship! The ‘Creative Use of Multiple Garments’ award goes to…
Meggipeg http://www.meggipeg.com ! She used Vogue 1316 to combine fabric from four different sources into this incredible tonal grey dress. Outstanding work, Meggipeg. The ‘Prom Dress to Red Carpet’ award goes to…
Michelle at www.thatblackchic.com made this stunning crop top and pencil skirt outfit for her daughter Mori from a thrifted prom dress. I particularly liked the contrasting topstitching. Congratulations! The ‘Chic But Thrifty Wedding Guest’ award goes to…
Gema at http://www.sequinsandslippers.com ! Well done Gema on transforming this rather plain dress into something spectacular. That yellow colour is fantastic, what a great find!
 Winners, please email Amy at sewamysew1 [at ] gmail [dot] com and she’ll let you know which pattern you won.
Congratulations again to all the winners and thank you to everyone who entered or supported the competition by spreading the word. I hope this has encouraged all you sewists to give refashioning a try!
And another big thanks go out to our sponsors who generously donated their awesome indie patterns for prizes. And… that’s a wrap for Repurpose Reuse Refashion 2014.
Refashion Inspirations – A Top 5 Guest Post
Another guest post from Sally of Charity Shop Chic to inspire you with your refashion projects for Repurpose Reuse Refashion this month. Just click on the image to check out the full post. Take it away Sally;
Need some ideas? Here are some of my favourite refashioning projects from my own wardrobe to help you get started.
1. This men’s jacket refashion was inspired by a Stella McCartney jumpsuit. Although it was quite an involved tailoring project, I had a lot of fun with it and learned a lot about tailoring in the process. 2. This trench coat was sent to me as a challenge from another blogger. I love a challenge and spent hours transforming it into something Kate Middleton-worthy.
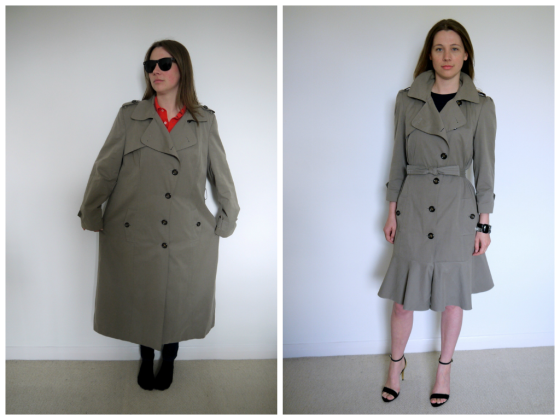 3. A moth-eaten wool kilt didn’t seem like the most promising material, but I made it work by freezing the fabric and cutting around the holes.
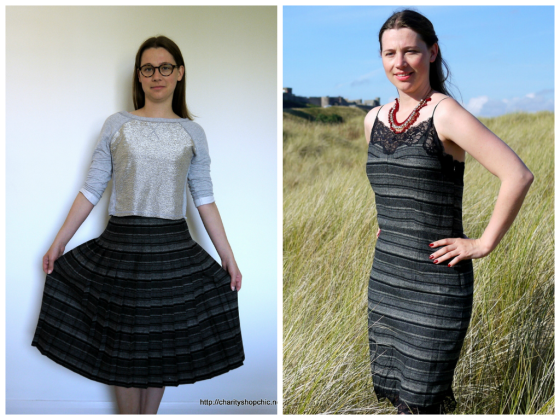 4. I loved the print on these silk trousers. There was so much material left that I worked it into a simple top for a matching summer outfit.
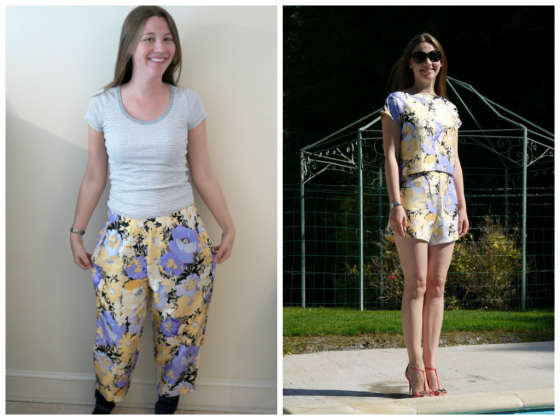 5. Another designer-inspired look, this project was a real challenge. Draping and patternmaking combined to create this unusual shirt.
Now if that doesn’t get you excited and inspired to get your refashion on I don’t know what will. I’m really enjoying my foray into refashioning this month, it’s really testing my fitting and problem solving skills in particular. I love that it’s making me a better sewist.
Don’t forget entries close September 1st and winners will be chosen from the Repurpose Reuse Refashion flickr group so upload your before and after shots to win a whole bunch of indie patterns people!
Refashion #1 An Exercise in Imperfection
I wanted to start off with something simple and practical for my first refashion. I’ve had this top in my wardrobe for more years than I care to admit. It’s too big but I just love the cowl neck, the colour and come on, who doesn’t love paisley? It’s a little too 70’s for me as is and it’s too big, I don’t know why I’ve held onto it for soooooo long.
 The Plan–
- Take the shoulder points in and bind the armholes with self bias binding cut from the sleeves.
- Add vents to the side seams to make it fall straight instead of blousing around the hem.
Simples. Vents, check. I just unpicked the seams and overlocking stitches and turned the seam allowance under and topstitched.
  After I took the sleeveless off I realised I had to take the gathers out of the yoke seam in order to attach the bias binding to the armholes smoothly. So far so good….
 Once I took the gathers out of the yoke seams and re-cut the armholes they turned out a bit too big (excuse my pit). It means I have to wear a camisole underneath it but that’s ok, I’m totally new at refashioning and I’m learning as I go.
 Even with it’s armhole imperfections I call it a triumph. It’s not going to languish in the dark corners of my wardrobe any longer, and that’s what Repurpose Reuse Refashion is all about. I totally love the fabric and will now get actual wear out of it! And, electric blue paisley….. hello?!
  Don’t forget to upload your refashion before and after shots onto our Repurpose Reuse Refashion flickr group to be in the running to win some great indie patterns.
